Chicken Salad Melts

What. A. Weekend. I had my entire family here, had a two day garage sale, and I’ve been sick the whole time. Nothing major; just a nasty cold that won’t let go, even when I think it’s over. Other than that, the rest of the weekend was good. My sisters and I met up on Friday for lunch and shopping, then we all drove back to my house for the weekend. My parents came down on Saturday night for dinner and Apples to Apples. We haven’t all been together since July, so it was REALLY awesome to be in the same place! The garage sale did ok; we did get rid of some stuff and made a little money. All in all, not a bad weekend. Oh! And tonight is the season premiere of “Once Upon a Time” and I have Scratch cupcakes in the freezer. So there’s that.

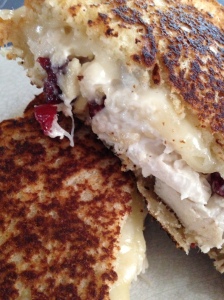
Tonight’s post features a pretty delicious chicken salad, if I do say so myself. (And I do.) It was chilly last week, so I thought I’d heat the sandwich in a fun twist. I hope you all like it! Beginners, this is a GREAT recipe to start with! The prep is minimal, and, if you’ve made a grilled cheese before, you’ll already be a pro! Plus, I’ve included some instructions for cooking and shredding your chicken below. Let me know what you think!

Chicken Salad Melts

IMG_2761

What I’m Listening to: Taylor Swift “Shake It Off” (Who ISN’T listening to that song?!)

Ingredients (makes 4 sandwiches)

-2 chicken breasts, cooked and shredded*

-2/3  to 1 cup of mayonnaise

-2/3 cup of slivered almonds

-2/3 cup of dried cranberries,

-1/4 of an onion, diced

-Garlic powder

-Butter

-8 slices of Swiss cheese

-8 slices of oatmeal bread

Place the chicken, mayo, almonds, cranberries, and onion in a large bowl and mix well. If the chicken salad is too dry, add more mayo. Add a pinch of garlic powder (trust me, a pinch is all you need) and stir. Use immediately, or store covered in the refrigerator for up to 4 days.

When you are ready to make your melt, butter one side of each slice of oatmeal bread. Place one slice, butter side down, in a lightly greased frying pan. Turn the heat to medium. Top the bread with two large scoops of chicken salad, pushing down with the back of the spoon. Top with 2 slices of Swiss cheese and another slice of bread, butter side up. Flip the sandwich every 1-2 minutes until the bread is golden brown and the cheese has melted. Make all four sandwiches at once, or make them one at a time. Enjoy!

* Looking for a simple way to cook and shred your chicken? Place it in a slow cooker, cover with water, and cook on high for 2 hours, checking on the chicken after 90 minutes. Cut each piece down the center, to make sure there isn’t any pink. Drain the water completely, then shred the chicken with an electric mixer. Easy!*

~~~~~~~~~~~~~~~~~~~~~~~~~~~~~~~~~~~~~~~~~~~~~~~~~~

Check out Table for One
Facebook                Instagram

Pinterest                  Twitter

Tortellini Carbonara

Guys…I just did the stupidest thing. I had half of this post typed out, ready to go, and I deleted it. Yes, that’s right. I deleted it. Clearly, I didn’t pay attention when my teachers told me to always save my work. Oops. So, I’m going to start over…

I think I had mentioned a few weeks ago that I was going to Chicago to visit one of my best friends, Ria, who was going to be in the States. I also got to see my friends, Danielle and Aubree, who I hadn’t seen in over a year. It was a wonderful weekend, full of friendship and amazing food! The first night, we ate at one of my favorite spots downtown, Quartino. (To be honest, I’ve only been there twice. But, it’s so good, it’s earned a spot as one of the best!) At Quartino, sharing is caring, so they recommend that you order several dishes for your party to pass around. Since we had 14 people, we decided to pair off to order. Ria and I got fettucine with marinara and basil (amazing), a quattro formaggi pizza (amazing!), and a tortellini with alfredo sauce, peas and prosciutto (AMAZING!) I knew I needed to recreate these recipes at home, so I started with the tortellini. This is comfort food at it’s finest. I used bacon in place of the prosciutto, but I was pretty happy with the result. I also really love peas, so feel free to put less in yours.

Tortellini Carbonara

photo 1 (9)

What I’m Listening to: “Shark Attack” by Grouplove

Ingredients (makes 3 servings)

-3 cups of frozen tortellini

-1/2 a stick of butter

-1 cup of heavy cream

-1 tsp of minced garlic

-1 1/2 cups of shredded parmesan cheese

-Black pepper

-1/2 tsp of dried parsley

-1/4 lb of bacon (To save money, buy it at a meat counter, rather than getting a big pack!)

-1 cup of frozen peas

In a large saucepan, heat lightly salted water to a boil. While the water is heating, cut the bacon into 1/2 inch pieces with a a pair of kitchen scissors. (A knife also works!) Place in a small skillet and fry for 6-7 minutes, stirring occasionally, until the bacon is crispy. Set aside.

In a small saucepan, melt the butter completely. Add the heavy cream and cook over low heat for 5 minutes. At this point, your water should be boiling so add the tortellini. Tortellini does not take long to cook, so make sure you keep an eye on it. After one minute, add the peas to the tortellini, and continue to boil for 2 minutes.

After the heavy cream has cooked, add the garlic and cheese, and whisk together quickly. If the cheese will not melt, you can turn up the heat to medium. Once the cheese is melted, stir in a few shakes of black pepper and the parsley. Remove from the heat.

Drain the tortellini and peas thoroughly, but do not rinse! Place back in the saucepan. Top with the alfredo sauce and bacon; mix well. The sauce will thicken as it stands, so serve when it is your desired consistency. Note: this meal is very rich, so pair with a side salad or fruit.

~~~~~~~~~~~~~~~~~~~~~~~~~~~~~~~~~~~~~~~~~~~~~~~~~~

Check out Table for One

Facebook                Instagram

Pinterest                  Twitter

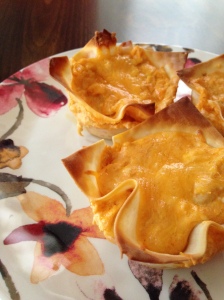
Buffalo Chicken Cupcakes

Remember when I said that last weekend was big for “Table for One?” Well, this week has been even bigger! I’ve got two exciting things to share!

*In addition to being on Facebook, Instagram, and Pinterest, Table for One is now on Twitter! Check it out here!

*After hearing from several of my followers, I’ve decided to do a (hopefully) weekly series of “Cooking for Beginners” posts. We’ll be covering all the basics, from cooking terms to spices you should have on hand. I’m really excited to get started! If there is something you’d like me to do a post on, comment below!

Alright, on to the food! You may remember my Caribbean Jerk Cupcakes from a few months ago. These are the original recipe, and a regular request from my friends. You can serve them as an appetizer or a main course, and they make delicious leftovers! The best part? They are very easy to make! (Beginners, you’ll like these.)

Buffalo Chicken Cupcakes

photo 3 (7)

What I’m Listening to: “Riptide” by Vance Joy

Ingredients (makes 12)

-24 wonton wrappers (The package I get usually has 48…an excuse to make them twice!)

-1 large can of chicken breast

-8 oz cream cheese, softened

-1/2 cup of ranch dressing

-1/2 cup of Frank’s buffalo sauce

-1/2 cup shredded cheddar cheese, plus extra for topping

Preheat the oven to 375. In a large mixing bowl, combine the cream cheese, chicken, ranch, buffalo sauce, and cheese. If you have a Kitchen Aid mixer or something similar, just throw everything in and mix on low. If not, a spoon works just fine. Make sure you don’t leave any big chunks of cream cheese; try to mix evenly.

Place a wonton wrap in each of the holes of a greased muffin pan by pushing the wrap in the center. The edges should curl up the sides to form a cup. Scoop about a tablespoon of the chicken mixture onto each wonton. Press another wonton wrap over the filling, and spoon another tablespoon of mixture on top. Lightly top each cupcake with shredded cheddar cheese. Bake for 12-15 minutes, or until the edges of the cupcake are browned. Serve as an appetizer or a main dish, with a fruit or vegetable side.

Note: The mixture keeps really well in the fridge! I will make 3-4 cupcakes at a time, over the course of a few days. You can also reheat the cupcakes in the microwave for 30-45 seconds, although they do lose some of their crispiness.

photo 2 (6)

photo 1 (8)

~~~~~~~~~~~~~~~~~~~~~~~~~~~~~~~~~~~~~~~~~~~~~~~~~~

Check out Table for One

Facebook            Instagram

Pinterest                 Twitter

Oven Roasted Italian Vegetables

Happy Sunday, foodies! It was a big weekend for “Table for One!” I hit 1,000 views, in just 5 months! Wahoo! You should have seen me last night. I was checking my stats every 3 minutes to see if we were there yet. I’m just a little excited, if you can’t tell. I know I say this quite often, but this little blog wouldn’t be what it is without you! Last night, one of my friends’ moms sent me a Facebook message, just to let me know that she’d tried a recipe and how much she enjoyed it! I love every view, share, like, and the feedback that each post receives, so keep it coming! How cool is it that my hobby has turned into something I can share with so many people? I’m one lucky girl!

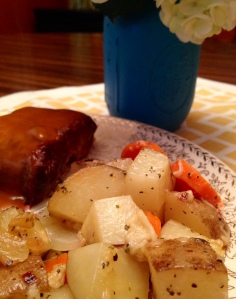
Ok, enough glowing. (For now.) Today has been a busy day! I’ve been cleaning the house, cleaning up my yard, putting up my Halloween decorations (yessss!), and making plenty of food to get me through the next few days. These oven roasted Italian vegetables were on the menu tonight, as a side to my favorite meatloaf. I don’t make side dishes often, since it seems like a lot of work for just me. But, I’m trying to incorporate more veggies into my diet, so I think side dishes are about to become my new best friend.

Oven Roasted Italian Vegetables

photo 1 (7)

What I’m Listening to: Episode 11 of “How I Met Your Mother”

Ingredients (makes 2 large servings, or 4 small servings)

-1 large baking potatoes, diced (peeled, if you wish)

-2 carrots, peeled and sliced

-1/2 a small Vidalia onion, diced

-1/2 tsp garlic powder

-1/4 tsp dried oregano

-1/4 tsp dried basil

-Red pepper flakes

-2 tbsp butter, cut into small cubes

-1/2 cup of shredded parmesan

Preheat the oven to 350. Wash and chop the potato and carrots. Place the vegetables in a greased 8×8 or 11×7 pan. Dice the onions and sprinkle over the potato and carrots. Evenly sprinkle the spices over the vegetables. Top with the butter cubes. Bake for 25 minutes, stirring once to evenly coat the butter and spices.

 photo 4 (1)

photo 3 (6)

Remove from the oven and top with the parmesan cheese. Bake for 10-12 more minutes, until the cheese is melted. (The vegetables will still be a little crisp at this point, so if you prefer them softer, bake them for an additional 5-10 minutes.) Allow to cool for 5 minutes, then serve!

photo 2 (5)

~~~~~~~~~~~~~~~~~~~~~~~~~~~~~~~~~~~~~~~~~~~~~~~~~~

For all the latest at Table for One

Facebook            Instagram            Pinterest             Twitter

Loaded Mashed Potatoes

Happy Wednesday! I’ve officially made it through my first week of classes. Getting back into my “school” routine is going to take some getting used to. Case in point: I slept until 9:30 today.  But, the year seems to be off to a good start. I’ve gotten called “Mom” a handful of times, and none of my dancers have gotten injured yet. I’m excited to see what week two brings…

Fall weather is starting to take over the Midwest, and I couldn’t be happier! Time to pull out the comfort food recipes. Mmmm. I’m pretty sure everyone out there has their own spin on loaded mashed potatoes, or has, at the very least, eaten someone’s spin on loaded mashed potatoes. My own version has evolved significantly over the last few years, but I’m very pleased with my current (and final?) result. This creamy side dish is perfect for a cold day, and has just the right amount of each flavor. Warning: it contains bacon grease…so it’s extra good!

Loaded Mashed Potatoes

loaded mashed potatoes

What I’m Listening to: The Avett Brothers on my Mumford and Sons Pandora Station

Ingredients (makes 4 servings)

-2 large baking potatoes, peeled and diced

-1 individual serving Greek Yogurt

-1/8 cup of milk

-1/4 pound of bacon, cut into 1/2 inch pieces (If you’re like me and can’t eat a whole package of bacon before it goes bad, get your bacon at a meat counter! I paid a little over a dollar!)

-1/8 cup of chives (I recommend freeze-dried, as they last for ages!)

-2/3 cup of shredded cheddar cheese, plus extra for topping

-Salt and pepper, to taste


Preheat the oven to 350. Boil the diced potatoes in a large pot of salted water for 10 minutes. While the potatoes cook, fry the bacon in a small skillet to your desired consistency. (I like mine extra crispy.) DO NOT DRAIN! You’ll need the bacon grease for later.

Drain the potatoes and place in a large mixing bowl with the Greek Yogurt. Add a splash of milk, and begin mixing on low speed with an electric mixer. Add the milk as needed. You may not use it all. Beat until the mixture comes together. I love lumps in my mashed potatoes, but if you don’t, beat for 2-3 minutes longer. Add the bacon and grease, chives, and 2/3 cup of cheddar to the potatoes, and beat until just combined. Salt and pepper as needed. 

Place the potato mixture in a greased 8×8 pan. Top with shredded cheddar. (Don’t be afraid to go crazy here. Extra cheese is ALWAYS a good thing.) Bake for 10-12 minutes, until the cheese is melted and the potatoes are cooked through. If it’s that kind of day, eat the potatoes alone. Otherwise, they make an excellent side to this Baked Parmesan Caesar Chicken.

~~~~~~~~~~~~~~~~~~~~~~~~~~~~~~~~~~~~~~~~~~~~~~~~~~~~~~~~~~~~~~~~~~~~~~~~~~~~~~~~~~~~~~~~~~~~~~~~~~~~

Keep up with the latest at Table for One

Facebook            Instagram               Pinterest

Kale Chips

Happy September! This year has gone so fast. I can’t even believe it! Don’t get me wrong; I am psyched that it’s almost fall, but just thinking ahead to another winter of polar vortexes has got me…pissy. I think that’s the only word for it. Anyway, I got to spend one of my last summer weekends (and the last weekend before school starts) with one of my best friends in the whole world, Ria. Ria lives in Australia and I haven’t seen her in two and a half years. Crazy, right? I drove into Chicago last Friday to spend two days with her, and then picked her up Monday morning to bring her here. It was the best weekend, and in true Steph form, involved delicious food…which, of course, in all the excitement, I forgot to take pictures of. But, I got lots of inspiration for future blog posts, so you’ll be seeing my version of many of the awesome dishes I tried on here soon. Ria is in town for one more day, so I’ll be spending some more time with her in between work and sleeping. Here we are this weekend…aren’t we cute?!

Stephand Ria

As I mentioned above, school is starting! Actually, it started yesterday. With my late night teaching schedule, I’ve been trying to find ways to keep my dinners healthy, since they usually occur after 10pm. I’ve been experimenting with kale chips, since they seem to be all the rage. I won’t lie; they taste nothing like a potato chip, but I really like them! This recipe makes just enough for one, so you won’t have to worry about storing the leftovers.


Kale Chips

IMG_2522

What I’m Listening to: lots and lots of Ed Sheeran on repeat

Ingredients (makes 1 serving)

-5-6 large kale leaves

-1 tbsp olive oil

-1/2 tsp seasoned salt (I like Lawry’s)


Preheat the oven to 350. Wash your kale leaves and put in a strainer. At this point, I pressed each leaf between several paper towels to dry them. You can also use a salad spinner, but I didn’t have one. Cut the leaf part off of the stem, and tear into pieces. Sprinkle the kale on a large parchment-lined baking sheet. Lightly drizzle the oil over the leaves, as evenly as you can. Too much oil will leave the kale feeling greasy. Sprinkle the seasoned salt over the kale. Bake for 12-15 minutes, or until the edges are browning, but not burnt. Allow to cool for 5-10 minutes. Serve with a hot or cold sandwich and some fruit.

IMG_2485

~~~~~~~~~~~~~~~~~~~~~~~~~~~~~~~~~~~~~~~~~~~~~~~~~~~~~~~~~~~~~~~~~~~~~~~~~~~~~~~~~~~~~~~~~~~~~~~~~~~~~~

Don’t forget to follow us for all the latest news at

“Table for One”

Facebook            Instagram            Pinterest